

FlightLog User Guide

FlightLog Android
Welcome to the FlightLog User Guide. This document will help you get started using FlightLog! Just breeze through from start to finish so you have a general idea how to use the different features in FlightLog before you get started.
Sections:
1 - The Home Screen!2 - Creating an “Aircraft”
3 - Creating Log Entries
4 - User Defined Fields
5 - Using the Query Builder
6 - Sharing a FlightLog Printable Report
7 - Backup and Recover data with Dropbox
8 - Accessing an older version of a Backup
Section 1 - The Home Screen!
When you first start FlightLog you will see the “Home” screen similar to the one shown below. This is what FlightLog will look like without any data.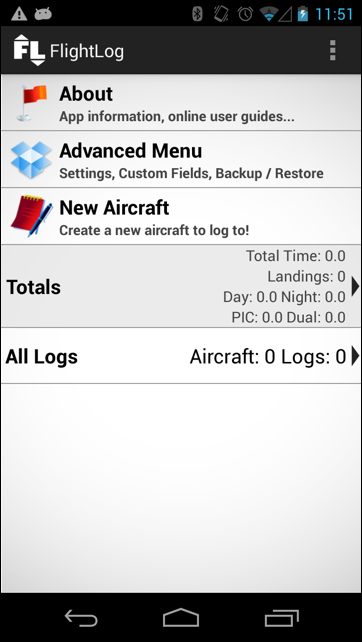
FlightLog 1.0 First Launch
Section 2 - Creating an “Aircraft”
To start creating log entries we need to create an “Aircraft”. Aircraft in FlightLog do not have to represent a single aircraft; it can represent a collection of aircraft that share similar properties. In the example below I created an entry titled “Cessna 182RG”. I decided to do this because I often use Cessna 182’s and want to keep all of my flight time together even though I may fly aircraft with different tail numbers.
By using an “Aircraft” in FlightLog to group log entries together you will be able to get “Aircraft” related statistics for your logs.
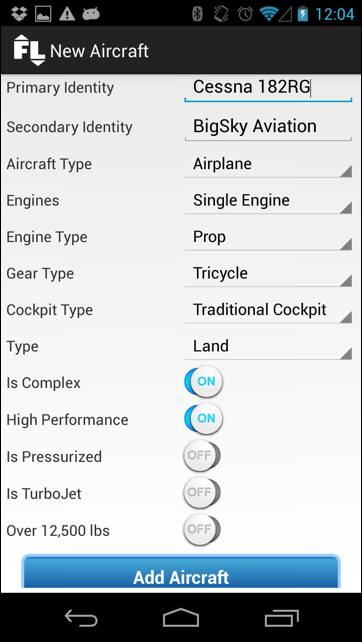
FlightLog 1.0 - Create Aircraft
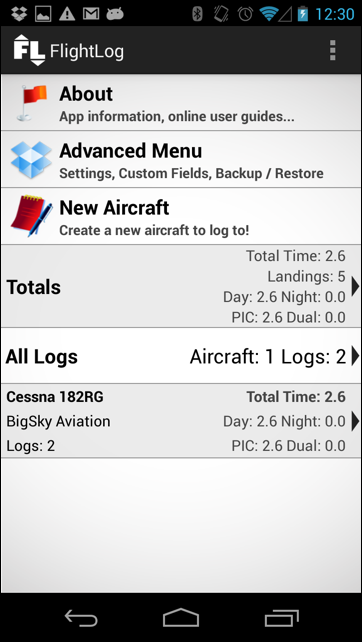
Once we tap the “Save” icon on the bottom of the screen we will be taken back to the home screen. The home screen with our newly created aircraft will look similar to the screenshot below.
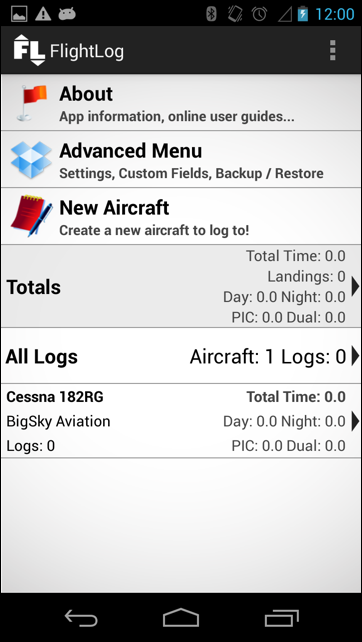
FlightLog with Aircraft created
Section 3 - Creating Log Entries
Now that we have an aircraft setup we can start logging time to it. Tap on the aircraft you just created and you should see a screen with two options on the top. “Edit Aircraft” allows you to change settings on the aircraft you just created, and “Add new log entry”. Tap to add a new log entry.
Below is what the default entry screen looks like. It is fairly simple and straightforward, but there are some tips that you really should know about this screen.
- Fill in “Total Time” before other time fields, then when you tap the other time fields they’ll automatically be set to the “Total Time” value.
- The blue button with the date in it will bring up a date picker to select a date for your log entry.
- The black circle with a “T” in it will bring up a text entry field that will let you type in a date. This allows for faster entry times for older log entries. These entries must be in the format MMddyyyy, so January 3rd, 2004 should be entered “01032004”.
- The black circle with a “+” will show up next to the registration field after you’ve entered registrations for other logs. This button gives you a quick list of previously entered registrations.
- Any user created fields you make will be listed under the “Note” field and the “Add Log Entry” button will shift down.
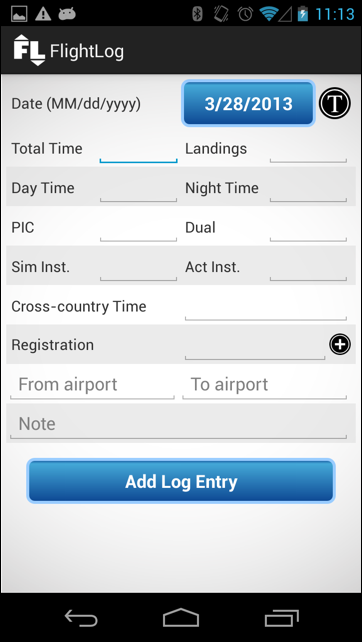
FlightLog 1.0 - New Log Entry
Tap the “Add...” button on the bottom left of the screen and you will be taken back to your log listing for this “Aircraft”. I have entered two logs in and this is what my logs screen looks like:
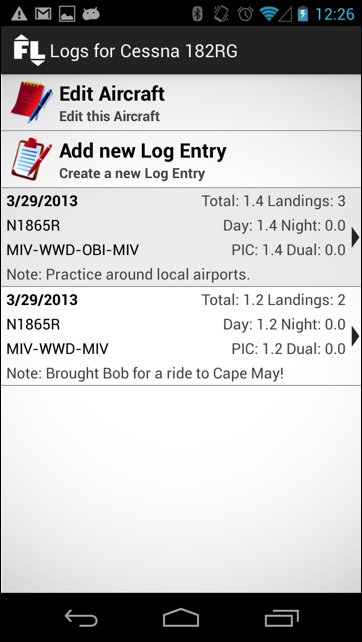
FlightLog 1.0 - Log Entries for Aircraft
Tapping on the back button from here will return you to the home screen, and you’ll see some totals show up for your aircraft. You’ll also see overall totals listed, but since we only have one aircraft these numbers should be the same.
Tapping on the cell labeled “Totals” will bring you to a list of all possible logging properties, including user created properties, and their accumulated totals. The screen looks similar to this:
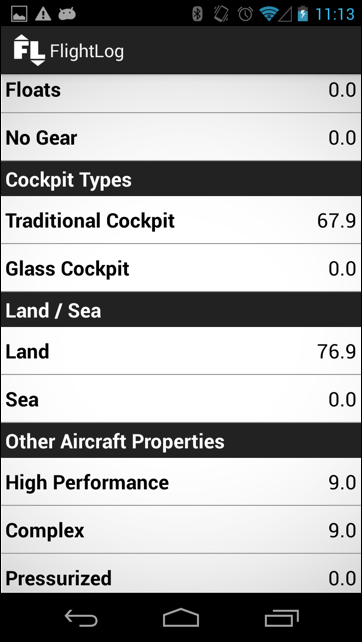
FlightLog 1.0 - Totals
Below the “Totals” cell there is an “All Logs” cell. This tells you basic information, such as how many aircraft and how many logs you have entered. Tapping this cell will bring you to a screen that shows you all of your logs merged together, sorted by date, regardless of what aircraft they were filed under. This means that if you have multiple aircraft, all of your logs for all aircraft will be listed together here.
Section 4 - User Defined Fields
One thing I learned from past experience is that you can never account for everyone’s needs by pre-defining fields. Someone out there somewhere really wants to track some king of wacky data. For this reason, FlightLog for android only has a handful of common fields included, but also allows users to define any fields they wish.You bring up the Custom Fields screen by tapping the “Advanced Menu” option on FlightLog’s home screen, and then selecting the “Custom fields” option. The screen look like the following:
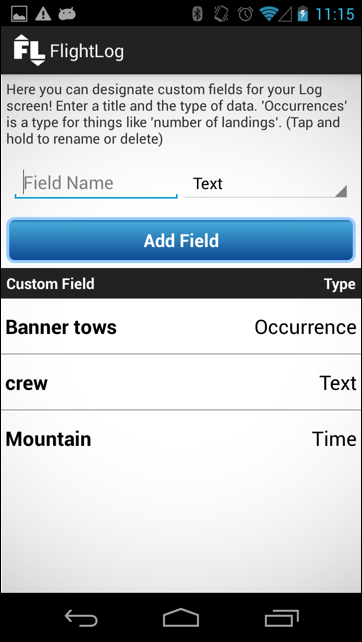
FlightLog 1.0 - Custom Fields screen.
From this screen you simply name the field anything you want, and then select a data type from the pop up list on the right. Current data types are:
- Time - Us this for fields that accumulate time, such as hours and minutes.
- Occurrence - Use this to keep count of things. Examples would include certain types of landings, banner tows, etc.
- Text - Use this to log textual data to your log entries, such as crew members, etc.
Once complete, the “Totals” screen will list your new fields with their accumulated totals.
Section 5 - Using the Query Builder
FlightLog has a feature called the “Query Builder” that lets you analyze your flight time. This allows you to determine exactly how much time you have for various fields, even custom fields that you created.Using the Query Builder is very simple. First, select the “Required Fields” option on the top of the menu to specify what type of time you are looking for in your logs. In my example below, I chose “PIC”, but you can choose more than one option from the list. For example, you could choose “PIC” and “Night”, and the results will only contain time that you’ve flown both as PIC and at Night.
Next, simply select a time period to analyze. There are a number of presets, such as “30 days”, which will use all time from now through 30 days ago. On the very bottom of the scrollable list there is an “All Time” option that will use all of your entered flight time. If you need exact dates, feel free to use the custom date option on the top of the screen (and then tap “Run Query”).
After the query is run, you will see a “Totals” screen that is all of the time valid for the required fields and the time period you specified. Here, you can look at the individual log entries with “Show Logs” or “Create a Report” to print or share. Note that reports generated from the Query Builder will specify the query parameters used to create the report at the top.

The Query Builder screen with “Required fields” selected.
Please note that “Mountain Time” and “Aerobatics” are
custom fields I’ve added to FlightLog.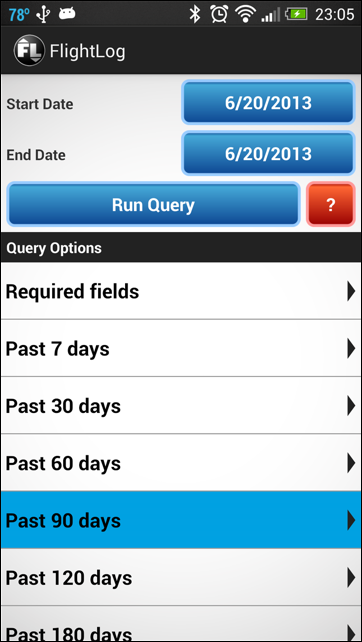
The Query Builder screen with “Past 90 days” pressed.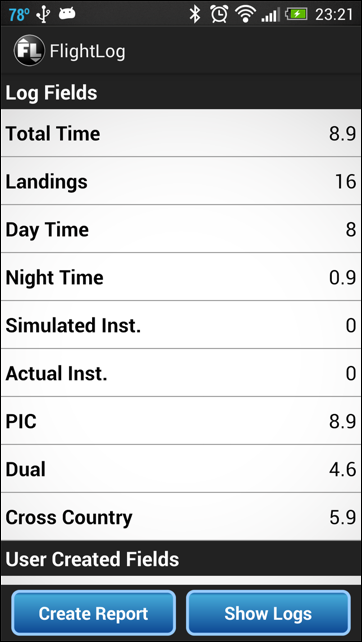
Totals screen after running a Query
Section 6 - Sharing a FlightLog Printable Report
FlightLog allows you to “share” a report of your flight time. The report all list all of your log entries and aircraft / log totals.The share feature allows you to choose what you want to do with the report after it is generated, and your device will present a list of compatible options for you. The screenshot below shows the options my phone provides after generating the report.
Notice that email will be a choice for you. This allows you to email yourself, an employer, or a colleague or friend a report of your flight time. If you have Dropbox installed you will be able to directly upload your report to your dropbox folder. This will make the file easily available to you on all devices and computers. (You likely will want to have Dropbox installed so that you can easily utilize FlightLog’s cloud backup feature) If you use Evernote, that will also appear as an option because you’ll be able to create a note with your log data attached.
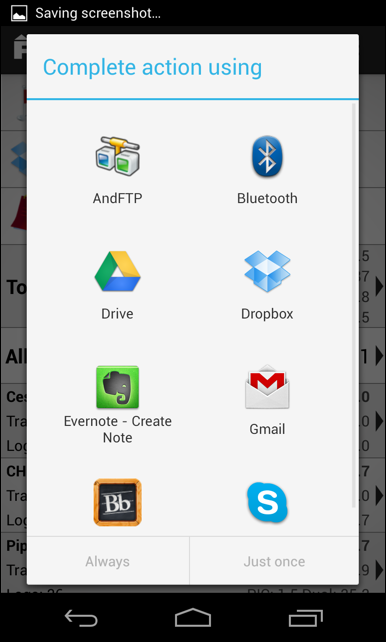
FlightLog 1.1 - Share Printable Report
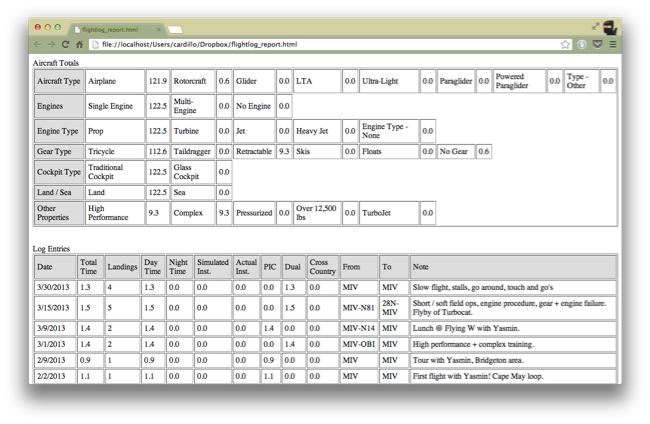
The resulting report is simply a formatted HTML file that can be opened with any web browser and printed easily.
Section 7 - Backup and Recover data with Dropbox
FlightLog integrates with Dropbox to allow you to store your data in the “cloud”. “Cloud” is just a fancy name for the internet and means that your data is stored off of your device on a server somewhere else for safe keeping. FlightLog also allows you to recover that data at any time and even from other devices running FlightLog, such as your Nexus 7 tablet!To get started with the Backup / Recover feature, tap on the “Advanced Menu” option on the home screen and select the “Backup / Recover” option. You will be presented with a screen with basic instructions on it and 3 buttons. In order for FlightLog to be able to backup your data it needs to be linked to a Dropbox account. Dropbox accounts are free and are very useful for storing files from your computer etc, so you will likely find use for it outside of FlightLog.
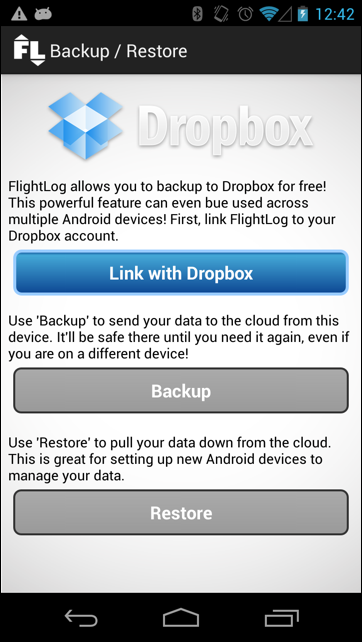
FlightLog 1.0 - Dropbox backup / recover
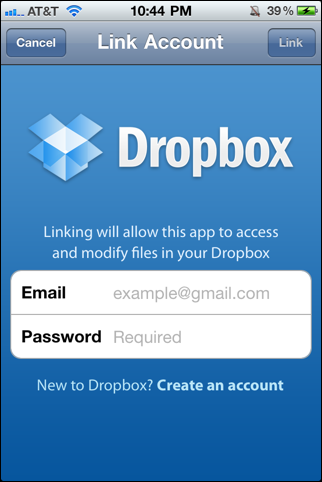
Tap the “Link Dropbox” button and you will be presented with a login screen. You can create an account from this screen if you do not already have one created, or create one from your computer here: Create Dropbox Account!
Once FlightLog has been successfully linked to Dropbox, the “Backup to Dropbox” and “Recover from Dropbox” button will be enabled. To backup your log data simply tap “Backup”. A confirmation dialog will be displayed asking you if you really want to upload the file because it will overwrite any existing backup currently on the server (but older versions will still be accessible by a computer-explained below). Tap “Backup” and you will see a screen show you that your data is being uploaded, and once complete you should see a message on the bottom of the screen state that the operation was “successful”.
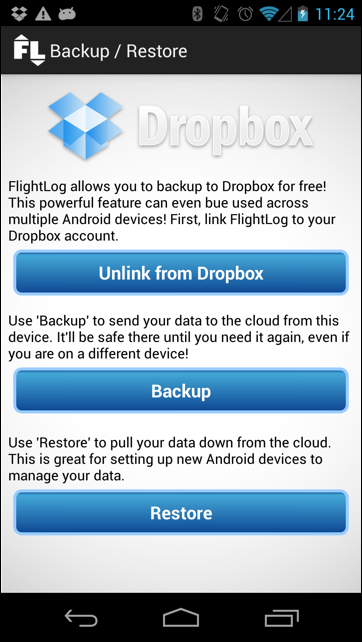
Recovering data has a similar process. Recovering data will overwrite all of your log data currently on your device so be sure there isn’t anything on there you wouldn’t want to lose. Tapping “Recover from Dropbox” will remind you of this before it downloads data.
In order to keep the backup / recovery process as simple as possible, FlightLog will only maintain one archive file. This means the user does not need to name files or select files from the server, it is all automatic. FlightLog will only use the latest file uploaded to Dropbox to recover from, but it is important to note that Dropbox maintains a copy of the last 10 changes of a file for a free account (infinite changes on a paid account). The next section will explain how to restore an older backup.
Section 8 - Accessing an older version of a Backup
Dropbox’s free account will store the last 10 version of a changed file, including your FlightLog backup. If you accidentally upload data that has errors or want to get back to a previous state, log in to Dropbox from your computer. In the “root” of your file structure, you will see a folder named “FlightLog Backup”. Click in to that folder, and you will see a file named “flightlog_data.db”. Right click this file and select “Previous Versions” and you will see a file history similar to this:
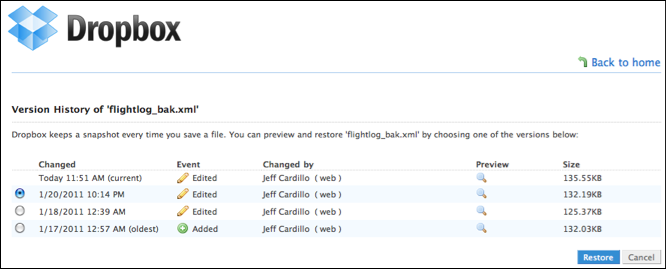
As you can see, restoring an older version of your data is as simple as selecting the date and clicking “Restore”. Also note that these files can be downloaded to your computer and stored.