FlightPlan User Guide

Welcome to the FlightPlan User Guide. This document will help you get started using FlightPlan! FlightPlan has many different tools available and this is a new guide so please have patience while I get it completed for all relevant features.
For information on using FlightScale use the dedicated guide for the FlightScale app.
Sections:
1 - About FlightPlan2 - The Home screen
3 - FlightScale - Weight and Balance (iPad)
4 - Weight and Balance (iPhone)
4.1 - Simple Template
4.2 - Moderate Template
4.3 -Helicopter Template
4.4 -Limits screen and Plot
5 - Navigation Calculations
5.1 - Course, Ground Speed, and Wind Correction Angle
5.2- Critical Point
5.3 - Heading, Ground Speed, and Wind Correction Angle
5.4 - Leg Calculation
5.5 - Navigation Log Calculator
5.6 - Windstar
6 - Fuel Calculations
6.1 - Point of No Return
6.2 - Flex Weight Take Off
Section 1 - About FlightPlan
FlightPlan started off as a very small app with only a handful of functions. Over that past couple years I’ve received a lot of feedback from users about what they wanted added to the app, and it has certainly grown quite a lot in features.If you would like something changed or added in FlightPlan I would love to talk with you about it. User feedback has made it what it is today, and it will only continue to evolve!
This guide will attempt to cover many of the features and calculations that may need explanation. The iPad and iPhone interfaces will be slightly different, but functionally behave very similarly. That said, if needed I will describe differences between the iPhone and iPad version of FlightPlan but otherwise this guide will serve to describe both.
Section 2 - The Home screen
FlightPlan has categories it uses to organize its tools and functions. FlightPlanHD for the iPad shows these categories on the left side of the screen (in landscape mode) while FlightPlan for the iPhone shows the categories as its main screen.
Tapping a category will bring you in to that collection of tools. The categories can be outlined as follows:
| Conversions | Converting units, such as Gallons of Jet-A1 fuel to Pounds, Knots to MPH, Millibars to In. Hg., etc. |
| Weather | Calculations such as Cumuliform cloud base, Density Altitude, etc. This category also gets you access to METARs and TAFs. |
| Navigation | Calculations such as Course, Ground Speed, Wind Correction Angle, Critical Point, etc. Also, access Airport, Navaids, and TFRs. |
| Fuel | Calculations such as Bingo Fuel, Joker Fuel, Fuel Burn / Endurance, Flex Weight Takeoff, etc. |
| FlightScale (iPad) Weight & Balance (iPhone) | This is a full version of FlightScale for weight and balance calculations built right in to FlightPlanHD! For the iPhone the weight and balance tools are slightly more limited because of the screen limitations. |
| MyLinks | This section allows you to add your own links to FlightPlan so that you can access them without leaving the app. This is especially useful if you want to check local weather / airport websites for your area. |
| News | This will show a dedicated webpage I use to post news, such as upcoming features or the occasionally defect that you should be aware of. |
| Settings | Select what units you would like to use for your calculations. |
| About and Guides | Just some info about the app with a link to these online user guides. |
Section 3 - FlightScale - Weight and Balance (iPad version)
For the latest guide information available on the use of FlightScale, please see FlightScale’s dedicated User Guide located here. FlightScale as a dedicated app and the version built in to FlightPlanHD for the most part are functionally the same. The left menu items will differ slightly but the use of templates etc will be the same.Section 4 - Weight and Balance (iPhone version)
The weight and balance calculation in FlightPlan allows you to easily find the center of gravity of your aircraft for both full and empty fuel weight.Section 4.1 - Simple Template
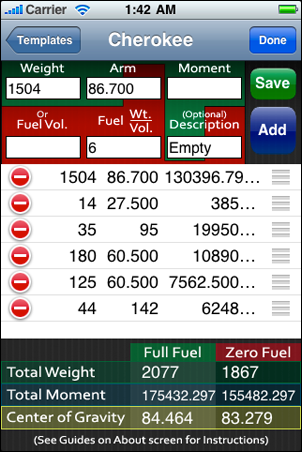
The simple template is designed to be used by aviators that generally fly 4 seater aircraft. If you need to account for more rows of seats, extra fuel tanks, etc, please try using the "Moderate" template.
All you need to do is fill in the boxes just like you would write out a weight and balance calculation on paper. For the Empty weight, if you have the Moment value, you can enter that directly. For all of the other values, enter the weight and arms. Please look at this example template filled out:
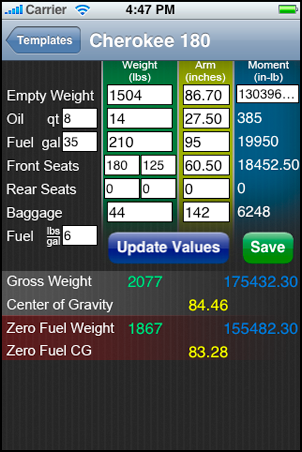
Notice how for the front seats there are two places to enter weights. The left fields represents the left side of the plane, while the right fields represent the right side of the plane. On the simple template, both front seats will have the same arm and both back seats will have the same arm, so you only need to enter that value once.
Fuel volume can be entered as any unit, such as gallons or litres, as long as your fuel weight per volume (Wt./Vol.) matches your other units. Example Wt./Vol. units are lbs/gallons or kgs/litres etc. In this example I have added 35 gallons with an arm of 95 inches, with a fuel weight of 6 lbs/gallon.
After all of the values you wish to enter have been typed in, tap "Update Values" to see your Gross Weight and Center of Gravity calculations. FlightPlan will show you both your full fuel and zero fuel weights and CGs.
If you fly this aircraft often, you may with to save the template by taping the "Save" button. After saving the template, you can easily open it again and just modify any values that have changed for your current flight, such as passenger or baggage weight.
Section 4.2 - Moderate Template
The moderate template allows the user to enter any number of weight/arm combinations to their calculation, including multiple fuel tanks, rows of passengers, extra baggage storage etc.
This template also allows you to calculate fuel by entering it as a volume instead of a weight. If you wish to enter a fuel calculation by entering volume, leave the weight field blank and fill in the volume field appropriately. Fuel volume can be entered as any unit, such as gallons or litres, as long as your fuel weight per volume (Wt./Vol.) matches your other units. Example Wt./Vol. units are lbs/gallons or kgs/litres etc. In this example I have added 35 gallons with a fuel weight of 6 lbs/gallon. When entering a fuel row by using the "Fuel Vol." field, "Fuel" will automatically be added to the description column after the row is added to your template.
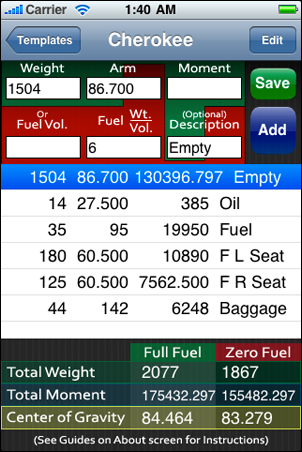
To start, fill in any two of the fields (Weight, Arm, or Moment) and whichever field is left blank will be calculated automatically. Usually you will fill in the Weight and Arm fields and then tap "Add". Once you tap "Add", you will see your entry pop to the list below and then you are ready to add a new entry.
If you would like to change an entry you have added, tap it in the list below and you will see the values fill the text boxes above again, and now you can edit the values. After you are finished editing you can hit "Add" and the list below will be updated with the new values. To re-order or delete items in the list below, tap edit in the upper right.
After you add a number of weight/arm entries you can see your resulting center of gravity and total weight being tallied on the bottom of the screen. There are two columns, one for zero fuel weight and one for full fuel weight. These represent your two extreme weight configurations for a typical flight.
Please note that in order for Full Fuel and Zero Fuel to calculate correctly, please enter your fuel amounts by using the "Fuel Vol." field.
Section 4.3 - Helicopter Template
The weight and balance calculation in FlightPlan allows you to easily find the center of gravity of your aircraft for both full and empty fuel weight. The helicopter template extends this functionality by allowing the calculation of both longitudinal and latitudinal center of gravity on one screen.
This template also allows you to calculate fuel by entering it as a volume instead of a weight. If you wish to enter a fuel calculation by entering volume, leave the weight field blank and fill in the volume field appropriately. Fuel volume can be entered as any unit, such as gallons or litres, as long as your fuel weight per volume (Wt./Vol.) matches your other units. Example Wt./Vol. units are lbs/gallons or kgs/litres etc. In this example I have added 35 gallons with a longitudinal arm of 3.86 meters and a latitudinal arm of -.004 meters, with a fuel weight of 6 lbs/gallon.
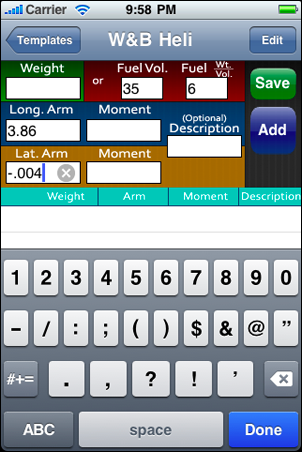
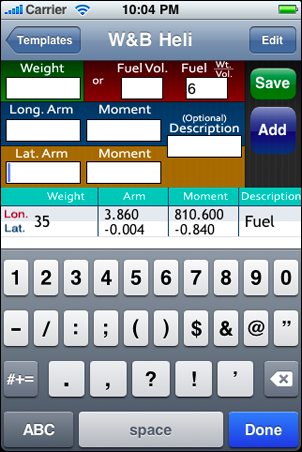
To start, fill in any two of the fields (Weight, Arm, or Moment) for both the longitudinal and latitudinal axis. Whichever field you leave blank will be calculated automatically. Usually you will fill in the Weight and Arm fields and then tap "Add". Once you tap "Add", you will see your entry pop to the list below and then you are ready to add a new entry. Notice how both the latitudinal and longitudinal calculations are shown in each row of the table.
If you would like to change an entry you have added, tap it in the list below and you will see the values fill the text boxes above again, and now you can edit the values. After you are finished editing you can hit "Add" and the list below will be updated with the new values. To re-order or delete items in the list below, tap edit in the upper right.
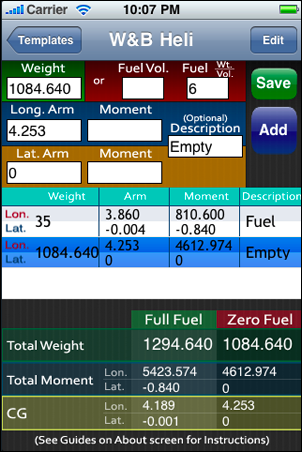
After you add a number of weight/arm entries you can see your resulting center of gravity and total weight being tallied on the bottom of the screen. There are two columns, one for zero fuel weight and one for full fuel weight. These represent your two extreme weight configurations for a typical flight. You will also notice that these columns are further broken up to show you both your latitudinal and longitudinal center of gravities.
Please note that in order for Full Fuel and Zero Fuel to calculate correctly, please enter your fuel amounts by using the "Fuel Vol." field.
Section 4.4 - Limits Screen and Plot
The templates for Weight and Balance now allow you to specify the Weight/CG envelope that is acceptable for your aircraft! This means that the results on the Weight and Balance calculation pages will show in red if you fall outside of your envelope, or green when you are inside of it. Also, the limits screen has the ability to plot your CG within the specified envelope. All template screens have a yellow button on them labeled "Limits". Tap this button to go to the limits setup screen.
The limits setup screen has a number of inputs available for you to enter the envelope information for your aircraft. There is an example diagram on the bottom of the screen that illustrates which order your points should be entered. The screenshot below shows my entry of the limits for a Cessna 152 aircraft. To show the live plot, tap “My Plot!” on the segmented control.
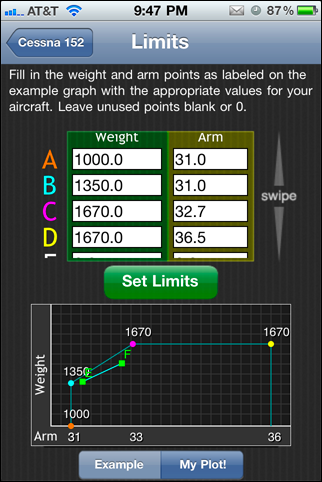
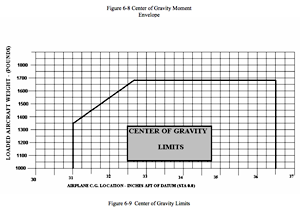
The proper values for your aircraft should be available to you in the aircraft's Pilot's Operating Handbook. Below, you will see the corresponding page from a Cessna 152 manual (Click image to enlarge) that I used to fill in my limits screen. Notice how the values from the graph correspond to my Limits screen above.
Simply enter your values from your Pilot's Operating Handbook in the order illustrated on FlightPlan's Limits screen diagram, then tap "Set Limits". Once you tap to set the limits, you will be taken back to the Weight and Balance calculation screen. Your calculation results will now be red if they are outside of the envelope, or green if inside. Please remember to re-save your template so that your limits will be saved with the rest of your data.
Section 5 -Navigation Calculations
A few of the calculations in the Navigation menu may need some further explanation and I have outlined them here. If you are looking for more information on a calculation not listed here please contact me.
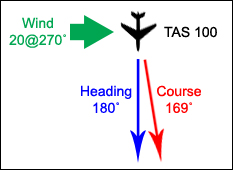
Section 5.1 - Course, Ground Speed, and Wind Correction Angle
This calculation will tell you what your course will be when you maintain a certain heading. Please do not confuse this calculation with Heading, Ground Speed, and Wind Correction Angle because that calculation will give you the opposite results of this one. Read further for an example.
This calculation takes your Wind Speed, Wind Direction, Heading, and True Airspeed as inputs. For this example, I will use a Wind Speed of 20, Wind Direction of 270, Heading of 180, and a TAS of 100. Keep in mind we have provided our heading and so we are looking for our course.

The results show that with our airplane heading south and a direct west wind our aircraft will be pushed to the east, and our course will be modified by 11Ëš to the east. This diagram below illustrates this:
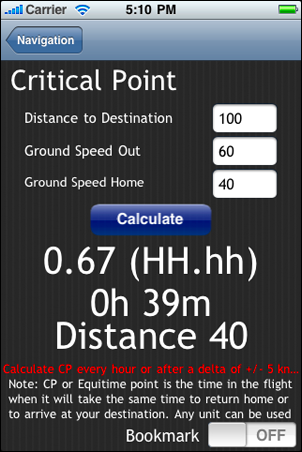
Section 5.2 - Critical Point
Critical Point or Equitime is the the distance and time when it will take the exact same amount of time to get to your destination as it will to get home.
For an example I will use numbers that will make it easy to illustrate how it works. We'll use 100 miles as a total distance we want to travel. For simplicity, we'll use a 10 mph tailwind heading toward our destination, and a 10 mph headwind for the way home. Using an aircraft groundspeed of 50 mph, this means our Ground Speed Out will be 60 mph and our Ground Speed Home will be 40 mph.
Running these numbers through the Critical Point calculation in FlightPlan shows us that our Critical Point occurs at a distance of 40 miles with a time of 39 minutes. This means that after 39 minutes of your flight, it will take you the same amount of time to reach the destination as it would to turn back for home.
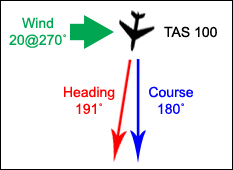
Section 5.3 - Heading, Ground Speed, and Wind Correction Angle
This calculation will tell you what correction angle you need to counter the wind and maintain your course. Please do not confuse this calculation with Course, Ground Speed, and Wind Correction Angle because that calculation will give you the opposite results of this one. Read further for an example.
This calculation takes your Wind Speed, Wind Direction, Course, and True Airspeed as inputs. For this example, I will use a Wind Speed of 20, Wind Direction of 270, Course of 180, and a TAS of 100. Keep in mind we have provided our course and so we are looking for the correction to our heading to maintain this course.
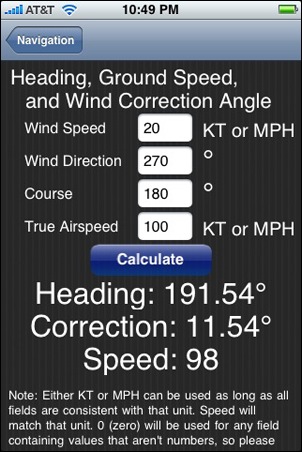
The results show that if we want our airplane to have a course directly south and there is a direct west wind, we need to adjust our heading into the wind so that we do not drift off course. This diagram below illustrates this:
Section 5.4 - Leg Calculation
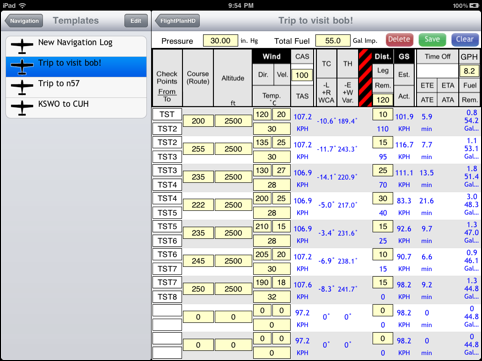
The Leg Calculator will help you make quick work of your navigation logs! All of the inputs you need are on one screen, and the results are all displayed for you there as well. Flipping between calculations to complete an entry in your navigation log is a thing of the past.
Below you will see an example entry in a navigation log (cut in half to fit on the screen) and a screenshot of FlightPlan showing you the results. Please note that the units used in this calculation can be changed from the Settings screen.
In this example navigation log, the red numbers represent values you know from planning, such as your course, altitude, CAS, etc. The blue values have been filled in with answers from the Leg Calculator in FlightPlan. The only number used not shown on the navigation log is the pressure, I used 30.01 in. Hg as shown in the screenshot.
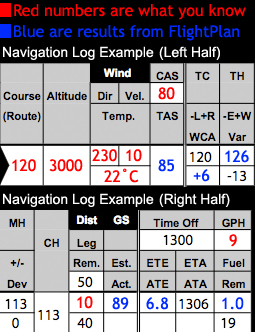
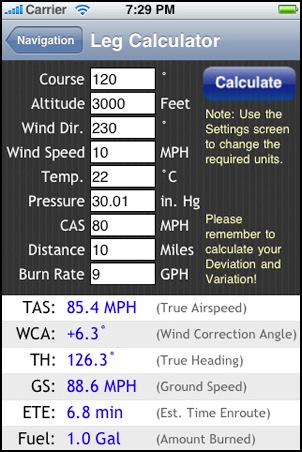
That is all there is to it! Just plug in your numbers and be done with the navigation log!
Section 5.5 - Navigation Log Calculator
The Navigation Log Calculator is a brand new feature in FlightPlanHD! This screen is meant to help you crunch the numbers for your navigation logs without breaking a sweat. This feature is new will evolve and improve over time.
Be sure that your units are set the way you want them on the settings screen. The units being used on this screen will be labeled so you can see them clearly.
All of the fields that you need to enter data for are highlighted in yellow. On the top portion of the screen, enter the information that will be used for all legs of the navigation log. These fields include Pressure, Total Fuel, CAS (calibrated airspeed), Length Remaining (total length of trip), and Burn Rate.
Each leg allows you to enter a From and To checkpoint, the Course, Altitude, Wind Direction, Wind Velocity (Speed), Temperature, and the Leg distance.
For each leg, this screen will calculate your True Airspeed, WCA (Wind Correction Angle), True Heading, Remaining Distance of trip, Ground Speed, Leg Time, Fuel Burned, and Remaining Fuel.
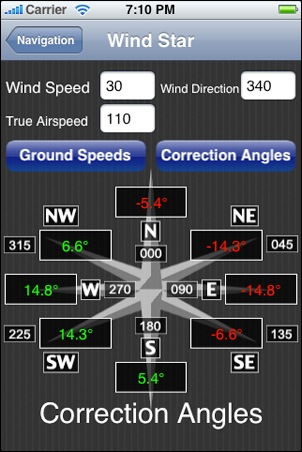
Section 5.6 - Windstar
The Wind Star is like the "Heading, Ground Speed, and Wind Correction Angle" calculation except it automatically calculates your course for each of the 8 directions of a compass. This is useful for planning alternate routes and stops by knowing what your ground speed and correction angle will be in each direction.
The Wind Star calculation screen comes up with 3 inputs and 2 buttons. The inputs allow you to enter the wind speed, the wind direction, and your true airspeed (TAS). There is a button to computer your correction angles and a button to computer your ground speeds. Notice that the ground speeds are calculated off of an adjusted course based on the correction angle given.
This first screenshot shows the correction angles for a wind-speed of 30 kts, wind direction of 340 degrees, and a TAS of 110, and this is obtained by pushing the "Correction Angles" button. A red number means it is a negative correction and a green number means it is a positive correction. With the wind at 340 degrees, it makes sense to see all of the corrections to the left of the imaginary wind line correcting positively and everything to the right of the imaginary wind line correcting negatively.
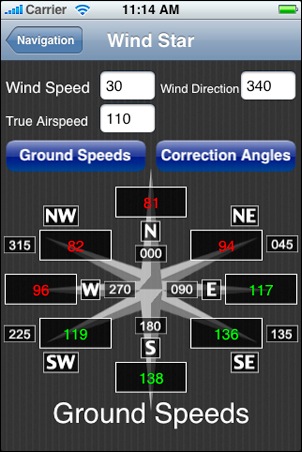
The next image shows the ground speeds for the same inputs and this is obtained by pushing the "Ground Speeds" button. Red ground speeds are slower than your TAS, yellow are the same as your TAS, and green are faster than your TAS.
Using the same imaginary line representing wind at 340 degrees, the numbers here again make sense. All angles heading into the wind have a reduced ground speed while all angles heading away from the wind have an increased ground speed. Keep in mind that the ground speed is calculated after the correction angle, which is why 90 degrees in the image below shows up with a speed loss (after you correct your angle you will be flying into the wind slightly).
Section 6 - Fuel Calculations
A few of the calculations in the Fuel menu may need some further explanation and I have outlined them here. If you are looking for more information on a calculation not listed here please contact me.
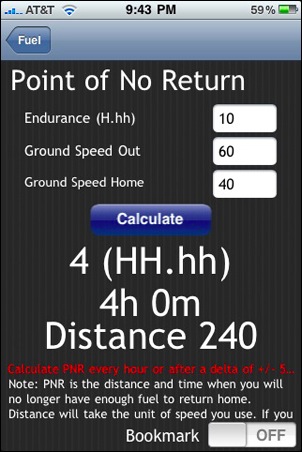
Section 6.1 - Point of No Return
Point of No Return is the distance and time when you will no longer have enough fuel to return home.
For an example I will use numbers that will make it easy to illustrate how it works. I'll use an endurance of 10, meaning that my aircraft will be able to stay in the air for 10 hours with my current load of fuel. I'll use a Ground Speed Out of 60 mph and a Ground Speed Home of 40 mph (pretending a 10 mph tailwind to our destination).
Running these numbers through the Point of No Return calculation in FlightPlan shows us that our PNR occurs at a distance of 240 miles and it will take you 4 to get there. At this point, you must either turn home immediately or commit to arriving at your destination. Any delay will mean that you will not have enough fuel to turn around and make it back home.
Section 6.2 - Flex Weight Take Off
Many times passenger aircraft must pay airway charges based on the aircraft weight, number of passengers, etc; This calculation will show the amount of tonnage available at each flex weight so that the pilot can accurately choose the appropriate flex weight based on the amount of fuel needed.
Since flex weight criteria can change, FlightPlan allows you to create a list of Flex Weights and save them as a template. This makes it easy for you to do this calculation against different types of aircraft, or simply set up a template for yourself that is different from the default.
This feature was developed in collaboration with a pilot from Ryanair; if this feature needs to be enhanced to meet your needs please contact me.
Usage:
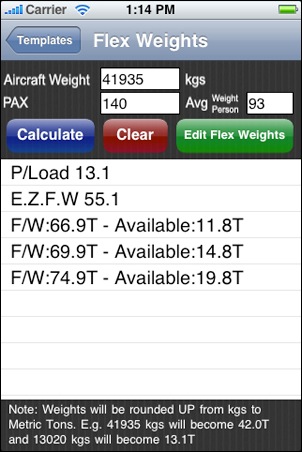
The default template for this calculation contains 3 Flex Weights 66.9T, 69.9T, and 74.9T. You will see after clicking the default template that you are brought to a screen that has 3 inputs, 3 buttons, and a list of calculations below.
The 3 inputs are Aircraft Weight (currently in kgs), PAX (number of passengers), and average weight per passenger (defaults to 93kgs). If you have a saved template your aircraft weight will be filled in for you by default every time you load that template. The clear button will not clear your aircraft weight since this number often remains the same.
The calculations performed show the P/LOAD (passenger tonnage), the E.Z.F.W (estimated zero fuel weight), and the available tonnage for each Flex Weight entered on this template. If nothing has been entered into the fields above, then available tonnage will equal the flex weights. For example, enter "41935" for Aircraft Weight and "140" for PAX, and you will see a real world calculation performed. Note that the weights used in this calculation will be converted to metric ton.
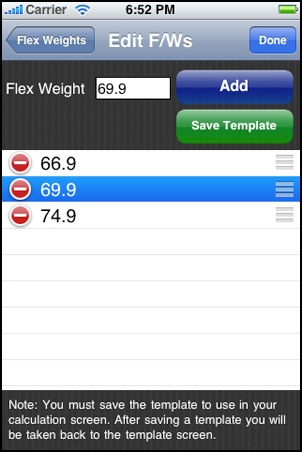
Editing Flex Weights and Saving Templates:
Clicking the green button labeled "Edit Flex Weights" will bring you to a screen with 1 input, 2 buttons, and a list of current Flex Weights. To add new flex weights, simply enter it into the field above and hit the add button! (Currently the unit is Tons) You can also select a flex weight from the list and edit its value. You can delete flex weights from the list and reorder them as well! Be sure to save your work as a template! You can't use your changes unless you save them!